I've wanted to make my own granola bars for a long time, but I haven't found a recipe I really like. I don't like crunchy granola bars. A lot of the recipes for chewy granola bars contain more sugar than I'd like. Granola bars aren't supposed to be cookies.
Well, I stumbled upon a recipe for a healthier oatmeal cookie that actually looked better than some of the granola bar recipes I've seen. Flourless oatmeal chocolate chop bites were born.
Notes: I don't know that these are gluten free, only because I don't know if my oats are gluten free. And is peanut butter gluten free? I have no clue. But I know these are flourless, if that helps!
These taste like a combination of banana bread and an oatmeal cookie. A plus in my book!
These will be easier to mix if the ingredients are at room temperature. If your peanut butter is a little stiff, zap it in the microwave for a few second so it loosens up. I used natural peanut butter here; the oil makes it easier to stir.
If you'd like to keep these egg-free, you could either use another tablespoon of peanut butter or a couple more bananas.
You could use raisins or any other dried fruit instead of chocolate chips.
These cookies don't expand or spread very much when you bake them, so if you want them flatter, be sure to smoosh them a little with your spoon when you put them on the baking sheet.
Ingredients:
2 cups rolled or old fashioned oats
1 ripe banana
1 egg
1 teaspoon pumpkin pie spice
1 teaspoon vanilla
1/2 cup of unsweetened apple sauce
2 heaping tablespoons peanut butter
1/2 cup mini chocolate chips
Directions:
In a large mixing bowl, beat the egg and mash the banana. Add in the vanilla, the peanut butter, and the applesauce. Stir to combine (it won't be perfectly smooth).
Add in oats, pumpkin pie spice, and chocolate chips. Stir until well mixed and the dough starts to feel like cookie dough.
Refrigerate for 30 minutes.
Heat oven to 350. Put tablespoonfuls of dough on a parchment or foiled lined baking sheet. Bake for about 20 minutes until golden brown.
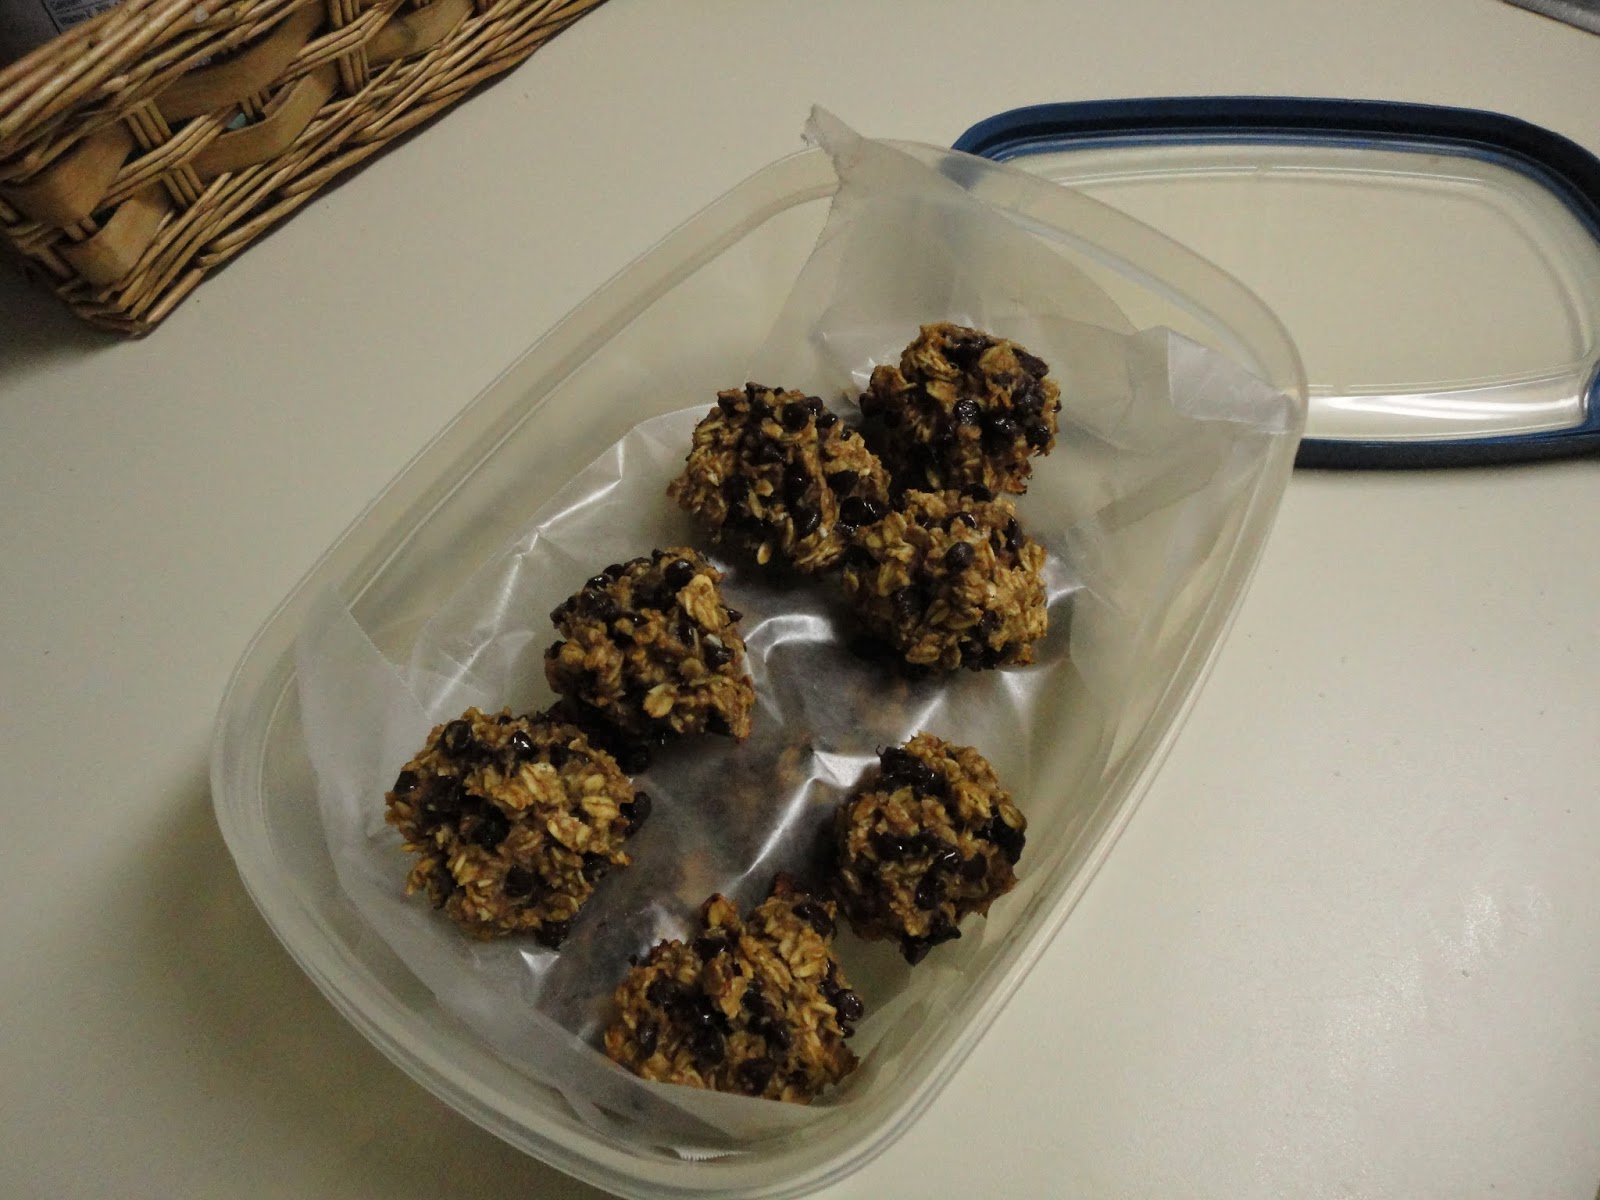
Store in an airtight container and separate the layers with wax paper. Enjoy!
Showing posts with label oats. Show all posts
Sunday, January 18, 2015
Friday, January 24, 2014
Eat Food, Save Money: DIY Maple Almond Granola
The first post I did on eating food and saving money was about making your oatmeal from the big can rather than buying the individual packets.
For you granola fans out there, you should consider doing the same thing. If you shop in the economical bulk section, you can buy several cups of oats and nuts at once, which is pretty much all you need for making granola. If you make it yourself, you can make a lot more than you could buy in a box in the cereal aisle, which means you'll save money in the long run. Also, you can make whatever flavor combination you want.
Notes: Granola is more of a method than a specific recipe. I wrote this recipe with the stuff I used, but you can use what you want. Essentially, it's 2-to-1 oats to nuts (or seeds) ratio, sweetener, some oil to keep it from sticking, and whatever spices you like.
You can add some dried fruit after it's done if you like. Keep it in an airtight container on the counter or in the fridge. It'll keep a little longer in the fridge.
Ingredients:
4 cups of rolled oats (you can use any type of similar grain)
2 cups of raw sliced almonds
1/2 cup of maple syrup
1/2 cup of olive oil
1 teaspoon of vanilla
1 teaspoon of cinnamon
1/2 teaspoon nutmeg
1/4 teaspoon of ground ginger
1/4 teaspoon cloves
1/2 teaspoon kosher salt
Directions: Heat the over to 300.
Add the oats, nuts, spices, and salt to a bowl and stir to combine. Add in syrup, vanilla, and oil to the bowl and stir.
Pour the oats onto a greased or foil-lined baking sheet and spread out in one layer. Bake for 30 minutes, stirring every 10 minutes or so, until the granola is fragrant and darker in color.
Allow it to cool on the baking sheet. If you want clusters, let it cool completely and then break it up into the size pieces you want. If you like flakier granola, stir it a few times while it's cooling to keep it from clumping.
You can eat it like cereal with milk or you can serve it on top of some yogurt. Eat food, save money, and enjoy!
Thursday, January 31, 2013
Eat Food, Save Money: Breakfast Edition
This is not so much a recipe, but more of a suggestion. Ok, it's probably more like a rant, but whatever. It's my blog.
Uncle Sam (read: the professor) wants you to stop buying those silly single-serving envelopes of oatmeal. You're wasting money and paper, and chances are you are consuming more junk than you need to.
First of all, buying in bulk saves you money. How much are those little packets costing? Maybe $3 or $4? You can get a big ol' canister of oatmeal for about a $1.50. You get more servings and it's cheaper, so why don't you do it?
I know, I know. The little packets are convenient. They're already pre-flavored and pre-measured, you'll say.
Look, I don't mean to sound like a jerk, but you do know how to use a measuring cup, right? What's more, the canister has the measurements and the water amounts written right there on the side! You have to measure the water when you use the packets anyway, so how much more time and energy does it take to measure out the oats, too? If you have a microwaveable bowl, you can make the canister oats in the microwave, too -- it literally takes the same amount of time.
Also, do you really want the pre-flavored oatmeal? Have you read the back of the box? How many terms in the ingredient list do you recognize as food? Yeah, I thought so.
Chances are the flavors you like in your oatmeal are things you already have in your kitchen. Cinnamon? Most people have that. Brown sugar? Most people have that too. Better yet, if you buy the canister of oats, you can have WHATEVER FLAVOR YOU WANT! Heck, you could throw some leftover pumpkin pie spice in there! Or how about some peanut butter? Buy yourself some dried fruit and some nuts out the (very economical) bulk bin and get creative.
You can eat real food AND save money. Ditch the packets. Go for the can.
Thursday, July 19, 2012
Peanut Butter Oat Mini Muffins
Because it's been so hot, we've been waking up early to walk the dogs. We take them on a pretty long walk every morning, so sometimes we both get really hungry before we get home to eat breakfast. I decided we needed a small pre-walk nibble.
Notes: These are designed primarily for energy. If you want a sweet treat, this ain't it!
These were very tender, which I like, but even more so than normal. I think the natural peanut butter's oil is to blame. You might need to add a tablespoon or two more of flour. Give it a try and see what you think.
Ingredients:
1 cup oats
1 cup spelt or whole wheat flour
1 cup yogurt
4 tablespoons butter
1/2 cup brown sugar
1/2 cup milk
1/2 cup peanut butter (chunky or smooth)
1 tablespoon chia seeds + 3 tablespoons water (or 1 egg)
2 teaspoons baking soda
1/4 teaspoon salt
1/4 teaspoon nutmeg
1/2 teaspoon cinnamon
2 teaspoons vanilla
Directions: Heat the oven to 350.
Heat the butter until it just melts and add it to a large bowl. Add in brown sugar and whisk together into a homogenous mixture.
Mix together chia seeds and water in a small bowl and set aside. When it gets sticky (about 5 minutes), add it to the bowl with the butter and sugar. Add in yogurt, milk, vanilla, and peanut butter. Whisk together until relatively smooth.
Add in the flour, oats, salt, spices, and baking soda. Stir in the dry ingredients until the batter is just combined.
Spoon into mini muffin tins and bake for 10-12 minutes until a tester comes out clean. Enjoy!
Saturday, July 7, 2012
Spelt Oatmeal Raisin Cookies
Who bakes cookies in the hottest part of the heat wave?!
The impulse baker does.
That's right, kids, she strikes again. I was piddling around online when I suddenly remembered that we had a giant can of oats in the cabinet. Scott normally makes oatmeal for breakfast, but since it's been hot, he's been eating granola.
You can't have oats just sitting around in the kitchen, waiting to be added to chewy delicious cookies, can you?!?
Notes: I replaced some of the flour in this recipe with some cornmeal. It added just the tiniest little crunch. So good!
I used my new favorite egg replacement (1 tablespoon chia seeds mixed with 3 tablespoons of water) in these. Worked like a charm.
Ingredients (slightly adapted from this recipe):
1/2 cup spelt flour
1/4 cup cornmeal
1 1/2 cup oats
8 tablespoons softened butter
2/3 cup brown sugar
3/4 cup raisins
1 tablespoon chia seeds + 3 tablespoons water
1 teaspoon baking soda
1/2 teaspoon nutmeg
1 teaspoon cinnamon
1/4 teaspoon kosher salt
1 teaspoon vanilla extract
Directions: Heat the oven to 350 degrees.
Add butter and sugar to the mixing bowl and cream them together. Mix together chia seeds and water and set aside. Add the raisins to a small bowl and cover with water (so that they plump up).
Add the flour, baking soda, cornmeal, nutmeg, cinnamon and salt together in a bowl and stir them together. To the butter and sugar, add vanilla and chia seed mixture. Add in dry ingredients a little at a time until everything is combined.
Stir in the oats and raisins. Spoon tablespoon-sized balls of dough on to two cookie sheets, leaving about 2 inches between cookies. Bake them for 10-12 minutes until the bottoms and edges are golden brown, but they're still slightly doughy on top. Cool for five minutes on the the hot baking sheet and then transfer to a wire rack.
It's never too hot for cookies! Enjoy!
Sunday, August 21, 2011
Adventures in Dough Part Four and VTMK: Spelt Oat Bread
I'm trying to whittle down the number of items I buy at the store. If there's something I can reasonably do at home that doesn't require me to become a chemist or a carpenter, I'm opting to do it. In light of that, I decided homemade bread is a good place to start.
Making bread can be time-consuming. I suppose it's made easier if you have a bread maker. But I have an aversion to extra kitchen gadgets, especially those only designed to do one thing. Those little tubes designed to remove garlic skins? Waste of material resources: it adds an extra step to your cooking and (especially if you are sans dishwasher) an extra thing to clean. I don't know if a bread machine fits into the same category, but I do know you make tasty bread without one.
Notes: This bread is delicious. It was easy to make; it took me maybe an hour and half. A very simple weekend project.
The bread is dense and crumbly. It makes nice toast, but it's not as great for sandwiches, unless you toast it beforehand. It would work better sliced thin, but my bread knife isn't sharp enough for that.
When it says "prepare the loaf pan," take it seriously. I didn't butter mine enough and had some trouble freeing the bread. You could, of course, use cooking spray.
Speaking of non-dairy items, not only is this a new adventure in dough, it's also the inaugural segment of VTMK, which stands for Vegan, To My Knowledge. I'm not vegan and I'm totally not an expert on what things are vegan and what things are not. But I know a lot of lovely people who are vegans or who are incorporating more vegan dishes into their diets. So, when I make a dish that I suspect to be vegan, I will flag it. My favorite vegans that know way more about this than I do can double check. If you're looking for vegan recipes, by the way, check out my friend Missy's lovely site: Vegan-in!
If you plan to use it like you would a regular loaf of bread, I recommend slicing it once it's cool all the way and storing the slices in a large food storage bag. If you keep the loaf whole in the fridge, it becomes more difficult to slice and will more likely fall apart on you.
Ingredients (adapted only slightly from this recipe by Heidi Swanson):
1 1/4 cups of warm water (between 105-115 degree F)
2 teaspoons of dry active yeast (1 packet)
1 tablespoon of honey (make sure it's room temperature)
2 cups spelt four
1 cup rolled oats (not instant or steel cut)
1 1/2 teaspoons kosher salt
Directions:
First, you'll need to bloom your yeast. Pour your warm water into medium-ish bowl. Stir in the yeast and the honey.
Let it sit for 10 minutes until it starts to look like more foamy and voluminous.
While your yeast blooms, add your flour, salt, and oats to a bigger bowl and mix well.
Once the yeast blooms, add the wet mix into the dry and form a dough ball. Prepare a loaf pan with cooking spray (or butter if you're not making the vegan version). Turn the dough ball out into the loaf pan.
Cover it with a damp paper towel and let it rise for 30 minutes. It will rise to the point where it fills up the loaf pan.
Heat the oven to 350 with the rack in the middle. Bake it for 35-40 minutes. When it's done, turn it out on to a rack to let it cool (if you leave it in the pan, it will steam and get soggy).
Once it's cool, slice it up and enjoy!
Making bread can be time-consuming. I suppose it's made easier if you have a bread maker. But I have an aversion to extra kitchen gadgets, especially those only designed to do one thing. Those little tubes designed to remove garlic skins? Waste of material resources: it adds an extra step to your cooking and (especially if you are sans dishwasher) an extra thing to clean. I don't know if a bread machine fits into the same category, but I do know you make tasty bread without one.
Notes: This bread is delicious. It was easy to make; it took me maybe an hour and half. A very simple weekend project.
The bread is dense and crumbly. It makes nice toast, but it's not as great for sandwiches, unless you toast it beforehand. It would work better sliced thin, but my bread knife isn't sharp enough for that.
When it says "prepare the loaf pan," take it seriously. I didn't butter mine enough and had some trouble freeing the bread. You could, of course, use cooking spray.
Speaking of non-dairy items, not only is this a new adventure in dough, it's also the inaugural segment of VTMK, which stands for Vegan, To My Knowledge. I'm not vegan and I'm totally not an expert on what things are vegan and what things are not. But I know a lot of lovely people who are vegans or who are incorporating more vegan dishes into their diets. So, when I make a dish that I suspect to be vegan, I will flag it. My favorite vegans that know way more about this than I do can double check. If you're looking for vegan recipes, by the way, check out my friend Missy's lovely site: Vegan-in!
If you plan to use it like you would a regular loaf of bread, I recommend slicing it once it's cool all the way and storing the slices in a large food storage bag. If you keep the loaf whole in the fridge, it becomes more difficult to slice and will more likely fall apart on you.
Ingredients (adapted only slightly from this recipe by Heidi Swanson):
1 1/4 cups of warm water (between 105-115 degree F)
2 teaspoons of dry active yeast (1 packet)
1 tablespoon of honey (make sure it's room temperature)
2 cups spelt four
1 cup rolled oats (not instant or steel cut)
1 1/2 teaspoons kosher salt
Directions:
First, you'll need to bloom your yeast. Pour your warm water into medium-ish bowl. Stir in the yeast and the honey.
Starts out looking like cloudy water |
Let it sit for 10 minutes until it starts to look like more foamy and voluminous.
Looks a little more puffy and opaque |
Once the yeast blooms, add the wet mix into the dry and form a dough ball. Prepare a loaf pan with cooking spray (or butter if you're not making the vegan version). Turn the dough ball out into the loaf pan.
Soon-to-be bread! |
Cover it with a damp paper towel and let it rise for 30 minutes. It will rise to the point where it fills up the loaf pan.
Post-bread nap |
Heat the oven to 350 with the rack in the middle. Bake it for 35-40 minutes. When it's done, turn it out on to a rack to let it cool (if you leave it in the pan, it will steam and get soggy).
Once it's cool, slice it up and enjoy!
Thursday, August 4, 2011
A Better Breakfast: Cinnamon Muesli
I have given up breakfast cereals.
This was actually a difficult decision for me. I've been eating cereal my whole life -- were it not for Cheerios, I probably wouldn't have made it past the age of four. Cold breakfast cereals are really refreshing and I still love milk as much as I did when I was a kid. But, then I started reading labels.
Ever look at a cereal box ingredients list? Those lists are long. I mean, really long. And they contain a lot of things that you might not expect: lots of different kinds of oils, various gums, colors that are identified by number. As I said when I started the blog, I don't so much have a food agenda. If I did have one, it would be probably in line with the real food movement. This fits well with my original plan: if you can't find it outside or you can't pronounce it, don't eat it.
And there's a bunch of things I can't pronounce on the back of cereal boxes.
So, now what? It's on to better breakfast food. If I do buy cereals, I go for the ones that have very short ingredients lists. Otherwise, I eat a hard boiled egg on toast or I make oatmeal. But my latest favorite breakfast food and the one I eat most often is muesli.
Muesli is one of those wonderful things that comes to us from the Swiss, along with delicious cocoa, those handy knives, and Roger Federer. There are plenty of pre-packaged kinds you can buy, but why bother? It's easy to make, cheaper, and you can experiment with your favorite stuff.
Notes: I had a hard time finding the dried fruit that I wanted. I made my batch before I had looked into the local health food store, which means I missed out on the figs and cherries I could have used. It's OK. I still love raisins and there's always next time!
You can eat your muesli either quick or "soaked." The quick version means you put muesli in a bowl and pour milk or yogurt over it just like regular cereal. I prefer the soaked version because the oats get a little soft overnight in the fridge. The trick, of course, is remembering to make it before you go to bed. It took me a few days to get into the habit, but I got the hang of it. If the absent-minded professor can remember, you can too.
This is a big batch. It will probably last me two months. You can't stretch a boxed cereal that long!
Ingredients:
4 cups rolled oats
1 cup raisins
1 1/2 cups of sliced toasted almonds
1/4 teaspoon of salt
1/2 teaspoon of cinnamon
1/2 cup of plain yogurt (for serving)
Drizzle of honey (for serving)
Directions:
Mix oats, raisins, almonds, salt, and cinnamon in a bowl. Toss until all the ingredients are coated with cinnamon.
Store in an airtight container.
To serve, mix 1/4 cup of muesli with 1/2 cup plain yogurt (I use Greek yogurt, but use what you like -- you could even use vanilla yogurt). Cover and refrigerate overnight. Drizzle with honey right before you serve it up in the morning. Enjoy a better breakfast!
Subscribe to:
Posts (Atom)