Friday, July 30, 2021

Chicken Pot Pie Risotto

It's just like me to decide that the hottest day of the summer is also the day to make risotto, a dish that you have babysit on the stove. It's a good thing this turned out well.

Notes: Risotto can be fussy, but it's worth it. The rice has a creamy, rich texture that you just don't get from regular rice. You make risotto using arborio rice, which you can find at the majority of grocery stores these days. It's usually right there with the other rice. You use a special method to make it. Instead of bringing water to a boil and then adding the rice, you add the warm liquid to the rice. This allows the starches to develop, which is how you get the creamy texture. 

This is essentially chicken pot pie over rice rather than in a pie crust. You make the filling just as you would if you were planning to bake it into a pie.

There are several steps to this dish, so you should do some things ahead of time. To make shredded chicken, I throw chicken breasts in a slow cooker for about 5 hours on low (set it for 8 and then check it at 5, if it comes apart easily and there's no pink, it's done). I did this step the day before I made the risotto. I also roasted the vegetables this morning and just kept them in the fridge until I was ready to make dinner. 

If you'd rather not do that much work, feel free to get a rotisserie chicken from the grocery store. You can also use some of the frozen mixed veggies. 

Ingredients:

For the rice:

1 cup of arborio rice

4 cups of water or chicken stock (approx)

2 tbs of butter

Salt and pepper 

For the chicken pot pie filling:

2 cups cooked shredded chicken

1.5-2 cups each of:

-Broccoli florets

-Celery, diced

-Green beans, cut into bite-size pieces

-Carrots, diced

-Frozen peas

-Frozen corn

1 onion, diced

5 tbs butter 

1/3 cup of flour

2 cups of chicken stock

1 cup of milk (not skim)

Olive oil

Nutmeg (a pinch)

Salt and pepper

Directions: Start with your roasted veggies. Put green beans, carrots, and broccoli on a baking sheet (you can mix them together). Drizzle them with olive oil, season with salt and pepper, and roast them at 425 for about 15 minutes. When they're done, set aside while you prep everything else. 

For the risotto, pour the 4 cups of chicken stock into a sauce pan heat it on medium. Heat a large skillet on medium-high and add a little butter. When the butter melts, add the dry rice, stir, and toast it just for a minute. Add about four ladles of stock to the rice and stir. Let the rice bubble away until it starts to look dry and then add two more ladles of stock. Continue this process until the rice is done. The timing will depend on your rice, it will be between 25-40 minutes. 

When the rice is about halfway done, start the pot pie filling. 

In a large skillet or stock pot, heat the 5 tablespoons of butter on medium-high. When it's melted, add the diced onion and celery to the pot and cook until translucent. Season with salt and pepper and stir in the flour. Cook for about 3 minutes and then whisk in the 2 cups of chicken stock. Stir well and then add the milk. Add the nutmeg and season again with salt and pepper. If the mixture gets too stiff, just add a little more milk until it loosens up. 

When the milk mixture thickens a little, stir in the chicken, the roasted veggies, the peas, and the corn. Let everything heat together (about 5-7 minutes). Add the rice and stir everything to combine. Serve (preferably on a day that isn't so hot) and enjoy!


Thursday, July 22, 2021

Loaded Veggie Burritos


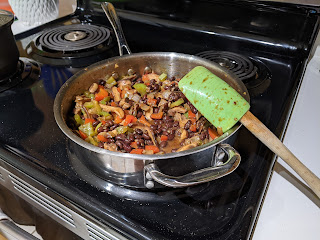
We've officially moved to Durham for my sabbatical year, so the professor is cooking from a new kitchen. It's got way more counter space than my old one. Unfortunately, it has an electric stove. I learned to cook with electric, so you'd think it wouldn't be a big deal, but I really love the precision and control that natural gas gives you. No matter! I'll re-adapt


Since we're still unpacking, I decided I needed a make-ahead, lots-of-leftovers dish. Veggie burritos are perfect for that. You can make them and assemble them, wrap them in foil, store them in the fridge and just heat them up for dinner. They only take about 30 minutes in the oven and then you're ready to eat. 

Notes: The best thing about making burritos at home is that you can control everything. You can add whatever veggies you want and season them how you want.

I like a yellow rice in my burritos and I have a favorite packaged version that I use (it's this one). If you don't like yellow rice, use your favorite. Spanish rice would be equally delicious. You can also just leave the rice out: add extra beans or extra mushrooms instead.

For burrito assembly, I like to make a little assembly line next to the stove. I divide my mixture into roughly equal portions depending on how many tortillas I have. That way you don't run out of filling before you get to the last tortilla. 

I buy blocks of cheese that I shred myself. I don't like the texture of pre-shredded cheese. If you use pre-shredded cheese, you may need to use the whole package. You should have about 1/4 cup of cheese per burrito.

Never rolled a burrito before? This video might help.

Ingredients:

2 bell peppers, any color you like

1 onion

5-6 garlic cloves

1 package of your favorite mushrooms (I used shitake)

About 2 cups of cooked rice (yellow, Spanish, white, or brown)

1 15 oz. can black beans

1.5 tablespoons cumin

1.5 tablespoons chili powder

2 teaspoons garlic powder

2 teaspoons onion powder

1 teaspoon cinnamon

1 teaspoon paprika (I use smoked)

1.5 teaspoons salt

Hot sauce, to taste

1 package of burrito-sized tortillas (8 or 10 count)

4-5 oz of cheese, shredded (I used pepper jack)

Olive oil for cooking the veggies 

Directions:

Dice your onions and bell peppers. Slice your mushrooms. Mince your garlic. Heat olive oil over medium-high. When the pan is hot, add all your spices (cumin, chili powder, garlic powder, onion powder, cinnamon, and paprika) to the oil and stir. Add the peppers and onions and cook until they're tender (about 8-10 minutes). Add your mushrooms and garlic and cook about 5-7 more minutes until the mushrooms get some nice brown color and shrink up. Add the salt and hot sauce toward the end of the cooking. 

While your veggies are cooking, shred your cheese and divide it into little piles according to how many tortillas you have. Drain your beans in a strainer. 

Once your veggies are done, stir in the cooked rice and beans. Turn the heat off and allow the mixture to cool while you prepare your burrito assembly line. 

Tear off squares of foil (about 10 x 10) according to how many tortillas you have. Divide your veggie mixture into little piles (just do this right there in the pan on the stove) according to your number of tortillas. Get your stack of tortillas and start assembling. 

Put a pile of the veggie mixture in the middle of the tortilla toward the bottom of the circle (but not all the way at the bottom). Add some cheese. Fold the bottom of the tortilla over the veggies and cheese. Fold in both sides to make a little package. For the last step, roll the little package over and up toward the top of the tortilla. The top of the tortilla becomes the "seam" on the bottom of your burrito. 

Put the rolled burrito on the corner of a piece of foil. Roll it up halfway, tuck in the sides of the foil, and then roll it the rest of the way. Put them in the fridge (I stack mine up straight on the shelf) They'll store nicely for about five days and freeze for even longer.

When you're ready to eat, heat the oven to 375. Pull the burritos from the fridge (keep them wrapped in the foil) and put them on a baking sheet. Bake for 30 minutes, unwrap, and enjoy!


Sunday, July 11, 2021

Grilled Summer Corn Pasta Salad

Let's not even joke about how long it's been since I posted a recipe here. 

I'll be honest: I love cooking, but I hate writing recipes. I'm imprecise, I don't follow directions, I make things up as I go, and I don't write anything down. Any recipe I create is an after-the-fact best guess at what I actually did in the kitchen. Also, I can't take pretty food pictures. 

All that said, I'm on sabbatical this year, and in a brief fit of madness, I thought "Hey, what if I dust off the cooking blog?" Scott thought it was a good idea. "You're happier when you have a project in the summer," he said. He is, of course, correct. 

So, I bring you a solution to a common summer cooking problem, namely convincing yourself to cook when it's hot. Pasta salad is a perfect remedy for this. First of all, you serve it cold, so it's refreshing. Second, because it has to chill in the fridge, you can make it in the morning when it's not so hot (that's what I did today). 


Notes: If you don't have a grill or a grill pan, you can just wrap your corn in some foil and bake it in the oven (at 400 for 20 minutes or so), but you won't get the delightful char flavor. 

Sub out the romaine for your favorite greens. I would just make sure it's something sort of light, like a baby spinach. Arugula would be good too, but it would be a stronger flavor.

If you want your mint and lemon to have a stronger presence in the dish, wait and add them to the pasta at the same time you add the greens.

Ingredients:

1 box dried, short pasta (elbows, shells, bowties)

1 package of baby romaine (10 or 12 oz)

4 ears of fresh corn

1/4 cup of olive oil

2 tablespoons of butter

1 small bunch fresh mint 

1 lemon

1 teaspoon dried dill

1 teaspoon onion powder

1 teaspoons kosher salt

1/2 teaspoon pepper

Red pepper flakes to taste

Directions:

Start with your corn: if you're using a grill, heat it to medium. Put the shucked ears directly on the grill. Grill for about 15 minutes, turning occasionally. Put aside and let them cool a little. 

While the ears are cooling, start your pasta. 

While the water is boiling, heat oil and butter in a small pan over medium-low. Add in dill, onion powder, salt, pepper, and red pepper flakes. Zest your lemon and add the zest to the oil mixture. Squeeze the lemon juice into the mixture. Once everything is heated through, turn off the heat. Allow to cool slightly. 

Once the oil mixture cools, add in your chopped mint leaves. Swirl everything around and let the mixture sit until the pasta is done. 

While the pasta cooks, give your greens a rough chop. Strip the kernels of corn off the cob by standing the ears upright in a large bowl and running your knife down the cob. The kernels will fall into the bowl.  

Once the pasta is finished, drain it and then return it to the pot on the stove (turn the heat off). Pour the oil over it and add the corn. Stir everything together. Allow the pasta to cool a bit (about five to ten minutes). Just leave it in the pot and stir it occasionally. If it starts to look dry and sticky, drizzle a little more olive oil over it. Add the chopped greens and stir until the greens wilt. Once you've mixed everything, give it a taste to check for seasoning (you might need to add some salt). Transfer everything to a large container and then chill in the fridge for at least 8 hours. Serve cold and enjoy!

Tuesday, March 22, 2016

What's in the Box? Couscous with Spinach and Fresh Mozzarella

More lunch ideas for you! I decided I wanted a salad, but not a lettuce-y one.

Notes: My grocery store carries tiny little mozzarella balls, so I used those. If yours doesn't, just grab a regular ball of mozzarella and dice it.

I used a garlic and herb flavored couscous. You could use the plain kind and season it any way you want.

Ingredients:
1 box of couscous
2 cups of baby spinach
1 cup small mozzarella balls or diced fresh mozzarella

Directions:

Chop the baby spinach. Cook the couscous according to the directions. When it's finished, add the spinach to the pot. Stir everything together until the spinach starts to wilt. Once it's cool, add the mozzarella.

Store in the fridge. Scoop some out into your favorite small lunch container and pack it up. Enjoy!


Monday, March 21, 2016

Shrimp and Grilled Pineapple Tacos


Earlier this month, I had a birthday. Normally, I love going out to restaurants for my birthday. But I had just come home from a conference the day before and I was tired. I pretty much just wanted to stay home. So I decided to make myself a delicious birthday dinner.

Notes: These tacos were a splurge for me because shrimp is expensive. But it was my birthday dinner, so splurging is the name of the game!

When you cook shrimp, you don't want to mess with them in the pan too much. Just put them in the skillet and try to flip them just once or twice.

Cleaning shrimp isn't so hard. You just need a sharp paring knife. Pull the shells, legs, and tail off. Then look for the vein: it's either along the back of the shrimp or underneath it. Whichever side it's on, run the tip of your knife along that side to expose the vein. Use your knife to scrape the vein out. That's it! It's helpful to have a wet rag or a paper towel next to you to help you keep your knife clean.

Ingredients:
3/4-1 pound of shrimp
1 small can of pineapple rings
1 large bunch of cilantro
1 lime
2 avocados
1 tablespoon cajun seasoning
1 teaspoon cumin
1 teaspoon chili powder
Soft taco shells

Directions: Look on your soft taco shell package and see what temperature to heat the taco shells on. Set the oven to that temperature.

Heat an indoor grill pan on medium high (I spray mine with some high temp cooking spray first). Grill the pineapple rings for about 2-3 minutes per side. Remove from grill and set aside.

Mix the cajun seasoning, cumin, and chili powder together in a small bowl. Peel and clean your shrimp (or just buy the pre-cleaned kind). Put the prepared shrimp in a bowl and sprinkle with the seasoning mixture. Toss (with your fingers) to coat.

Heat a large skillet over medium heat. Add a couple of tablespoons of butter or oil. When the skillet is warm, add the shrimp. Cook until the shrimp start to curl up, turn pink, and become opaque.

Wrap the taco shells in foil and warm them up. While the shrimp is finishing up, cut the pineapple rings into small pieces. Add the pineapple to the pan to warm it through. Roughly chop the cilantro. Cut the avocado and scoop it into a bowl. Squeeze the lime over it and mash it up a little.

To assemble, put a spoonful of avocado on to the tortilla. Add the shrimp and pineapple. Top with cilantro. Serve and enjoy!

Sunday, March 20, 2016

What's in the Box? Baked Mini Spinach and Cheese Quesadilla

It's that time of the semester when I fall behind on the recipes. I promise I've been cooking; I just haven't been posting!

Time for another edition of What's in the Box? If you're tired of plain old sandwiches, why not try a veggie quesadilla instead?

Notes: These come out pretty thin, so I don't know how well they will work for lunch all by themselves. I brought some other stuff along with me and had plenty to eat.

I prepped these on Sunday so I had one for each day of the week. Worked perfectly--so much easier than trying to fix them during the week.

Cutting these with a pizza cutter was super easy.

Once these were cooled and cut, I stored each one in a sandwich bag in the fridge. That way all I had to do is throw one in my lunchbox before school.

I ate mine cold (I don't mind cold quesadillas), but you could nuke yours in the microwave at work if you like them warm.

Ingredients:
10 taco-sized flour tortillas
2 cups fresh baby spinach leaves
1-1 1/2 cups grated colby jack cheese (or other melting cheese)

Directions: Heat oven to 350.

Line a baking sheet with foil. Put 5 tortillas on the baking sheet. Tear the spinach leaves into smaller pieces. Put a thin layer of cheese on each tortilla. Add a layer of torn spinach leaves. Add another layer of cheese on top (if you like more cheese). Top with a second tortilla.

Bake for approximately 10 minutes until the quesadillas start to brown and crisp. Allow the quesadillas to cool.


Cut into four triangles and store in the fridge. Enjoy warm or cold!

Tuesday, February 16, 2016

Chicken Pot Pie Soup

Winter weather has reared its ugly head yet again. Time for a warm and toasty soup.

Notes: This tastes EXACTLY like the inside of chicken pot pie. If you like chicken pot pie, you will like this soup.

I served mine with homemade buttermilk biscuits. If you don't want to bother, grab your favorite bakery rolls.

Since there's lots of chopping involved, you might want to save this for a weekend. Or you could do what I did and do all your chopping on Sunday. I just kept all the chopped veggies in the fridge. Then I just made the soup on a weeknight.

I made my chicken in the crockpot over the weekend. I bought a pack a chicken tenders and just set it on low for about 5 hours. I shredded it, put it in a tupperware container, and it was ready for me along with the veggies.

If you want to forgo the chopping altogether, just grab a bag of mixed frozen veggies! Couldn't be easier.

Ingredients:
2 cups cooked shredded chicken
5-6 carrots
5-6 celery stalks
1 cup frozen corn
2 cups green beans in bite size pieces
1 onion
1 bunch parsley
4 cups of chicken stock
1/3 cup milk
4 tablespoons butter
4 tablespoons flour
1/4 teaspoon nutmeg
Salt
Pepper

Directions:

Prep all the vegetables: dice the carrots, celery, and onion. Mince the parsley. In a large stock pot, melt the butter. Add in all the veggies and parsley. Saute for a few minutes. Add in the flour and stir to coat the veggies. Add in the chicken stock. Bring the pot to a boil and then turn the heat down to simmer. Season with salt, pepper, and nutmeg.

Simmer for at least 30 minutes. About 10 minutes before the time is up, add the chicken and corn. During the last 5 minutes, stir in the milk.

Serve and enjoy!